Introduction
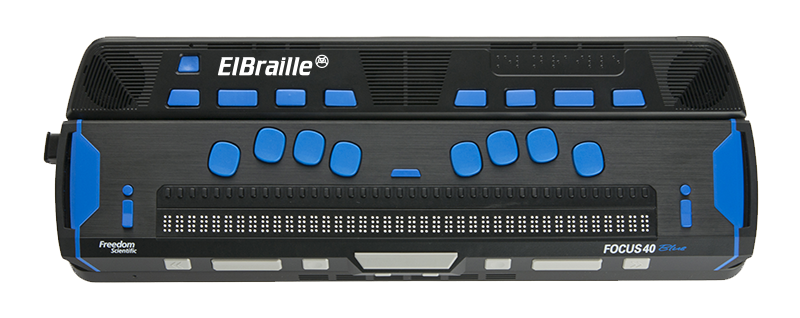
Welcome to your ElBraille, the twenty-first century, take anywhere replacement for the dedicated notetaker. Running Windows 10 Windows 11 with JAWS, and a Braille display with a full Braille keyboard, your ElBraille 40 is a fully accessible compact computer.
The ElBraille includes the following key features:
- Runs Windows 10 or Windows 11 64-bit and JAWS
- Focus 40 Blue 5th Generation Braille display
- You can choose from two CPU configurations up to 7th generation Intel® Core™ i5-7Y57 Processor with vPro technology Dual-core (4M Cache, up to 3.30 GHz)
- 4 or 8 GB RAM
- 128 GB internal storage
- Two stereo speakers and headphone/microphone jack
- Additional sound and vibration feedback for key functions such as powering on and off or connecting or disconnecting the AC adapter
- SD card slot supporting SD, SDHC, SDXC up to 2 TB
- 2 USB 3.0 ports and 1 USB C port
- HDMI port
- Wireless WLAN802.11 A/B/G/N/AC networks support (2.4 and 5 GHz)
- Bluetooth V4.2
- A built-in 4G LTE modem for cellular connectivity supporting 7 Cell networking standards
- Rechargeable 21.5 Amp Hour battery (Approximately 15 hours on battery)
- Specially designed apps for performing popular actions such as the creation of voice or text notes, listening to audio content, and more
- Supports Microsoft Office 365, Office 2021, Office 2019, Office 2016
What’s in the Box
- ElBraille W40J unit
- ElBraille eco-leather carrying case with a shoulder strap
- ElBraille AC adapter
- ElBraille User Guide
Physical Layout
Position the ElBraille on a flat surface so the opening for the braille display is directly in front of you.
On the left side, going from front to back, you will find a lever for locking and unlocking the Focus display.
HDMI port for connecting an external monitor.
On the right side, going from front to back, you will find a headphone jack, SD card and Micro-SIM card slots, two standard USB ports, and a USB C port. The Micro-SIM card slot is located directly under the SD card slot and allows you to insert a SIM card from a cellular provider and use the built-in 4G LTE modem. The USB C port is used for charging the unit as well as connecting the ElBraille to a PC so you can use the Focus 40 Blue as a braille display over USB with another device.
The front part of the unit contains the braille display. The internal microphone is located on the very front closest to the left corner.
Above the display are seven buttons. Going from left to right, they are: E1, the Volume Up/Down rocker, E2, E3, E4, E5, E6 (also referred to as the Display Connection Mode button), and E7. A recessed Power button is located directly above E1 with the LED indicator positioned above the Power button. The speakers are located to the left and right of these buttons. A fan vent is also positioned above the buttons toward the center.
LED Indication Types
The following table lists the available LED indicator types.
| Color | Meaning |
|---|---|
| Green | The unit is turned on and running on battery |
| Yellow | The unit is turned on and plugged into an outlet using the AC adapter |
| Red | The unit is turned off and charging |
| No indication | The device is turned off and is not charging. If the unit is plugged in, it can also mean the battery is fully charged. |
Docking and Undocking the Braille Display
To dock the Focus 40 Blue with the ElBraille, do the following:
- Gently pull the locking lever on the left side of the ElBraille until it is fully retracted. Do not attempt to force the lever beyond the point where it stops.
- Lower the Focus display until it is resting in the open front section of the ElBraille and make sure the back edge of the Focus is flush with the section containing the ElBraille buttons.
- Push the locking lever to lock the display in place and establish the USB connection.
In most cases, you can leave the Focus docked with the ElBraille as you can use it over Bluetooth or even USB with another device and easily switch back to using it with the ElBraille. If you need to undock the Focus 40 Blue, do the following:
- Remove the ElBraille from the leather carrying case.
- Gently pull the locking lever on the left side of the ElBraille until it is fully retracted. Do not attempt to force the lever beyond the point where it stops.
- Slightly lift the left end of the display and slide it to the left to release the right connectors and then lift it away from the unit.
If the Focus is not docked, you can still operate ElBraille using a standard USB or Bluetooth keyboard as the ElBraille is a full Windows 10 or Windows 11 PC.
Description of Focus Blue Controls
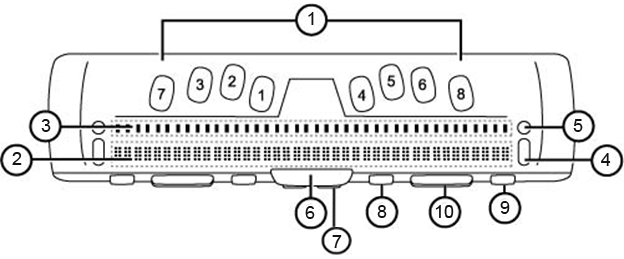
The refreshable braille cells are located toward the front of the unit. There is a Cursor Router button above each braille cell. At each end of the display's surface are NAV Rockers used for easy navigation. Positioned above each NAV Rocker is a NAV mode button which cycles through different navigation modes.
Positioned directly above the Cursor Router buttons is an 8-dot Perkins-style braille keyboard. Going from the center, the left-hand keys contain the following: Dot 1 under the index finger, Dot 2 under the middle finger, dot 3 under the ring finger, and dot 7 under the little finger, while the right-hand contains: Dot 4 under the index finger, Dot 5 under the middle finger, Dot 6 under the ring finger, and Dot 8 under the little finger. These keys are used to enter text or perform commands. Between dots 1 and 4 is a Menu button which is used to access the Focus configuration menu as well as display Focus status information during an active connection.
On the front edge, directly under and in the center of the display is a Spacebar. This key is used together with the braille keys when entering commands. A command that includes the Spacebar is commonly referred to as a chorded command. For example, L Chord or Dots 1-2-3 Chord.
On the very front of the display are the following controls, located from left to right: Left Panning button, Left Rocker bar, Left Selector button, Left Shift button, Right Shift button, Right Selector button, Right Rocker bar, and Right Panning button. For more information about the Focus Blue controls, refer to your Focus Blue User’s Guide.
Overview of JAWS BrailleIn
The JAWS BrailleIn feature allows you to use the Perkins-style braille keyboard on the braille display to control ElBraille. Using the keyboard along with other Focus controls, you can perform all Windows and JAWS commands that you can do from a regular QWERTY keyboard. In addition, you can also enter text using contracted or uncontracted braille. For more information about BrailleIn, refer to the JAWS Help.
Modifier Keys
Use the keys on the braille display to simulate key combinations (keystrokes) that include Ctrl, Alt, Windows Key, Shift, or the JAWS Key (Insert). To use these modifiers when typing a keystroke, do the following:
- Hold down Dot 8 Chord and then press the corresponding modifier keys in the keystroke. Modifier keystrokes are listed below.
- After you create the modifier portion of the keystroke, release the keys and press the remaining part of the keystroke. For example, to perform the keystroke Ctrl+Shift+V, you press Dots 3-7-8 Chord, release the keys, and then press V (Dots 1-2-3-6).
The modifier keys are as follows:
- Function Keys (F1 through F12): Dot 1
- Insert: Dot 2
- Ctrl: Dot 3
- Windows Key: Dot 4
- JAWS Key: Dot 5
- Alt: Dot 6
- Shift: Dot 7
Instead of memorizing these keys by their dot position, it may be easier to learn the finger with which each key would be associated. When all of your fingers are on the braille keyboard, the layout would be:
- Function Keys: Left index finger
- Windows Key: Right index finger
- Insert: Left middle finger
- JAWS Key: Right middle finger
- Ctrl: Left ring finger
- Alt: Right ring finger
- Shift: Left little finger
Notice that you can create a rather loose correlation between pairs of fingers in this description. For example, the left index finger is Function Keys while the right index finger is the Windows key. A stronger correlation can be made with the left and right middle fingers. The left is the Insert Key and the right is the JAWS key, both often serving the same purpose in JAWS usage. Finally, the left and right ring fingers are the Ctrl and Alt keys respectively, which make these two positions easier to remember.
Once this layout is understood, it is easy to grasp that Any time a modifier key, or combination of modifier keys is used as part of a command, Dot 8 Chord will always be included.
Finally, pressing any of these modifier keys with Dot 8 Chord is the same as pressing and holding any of the equivalent keys on the QWERTY keyboard. The computer is waiting for the key or keys which the modifier keys will modify. So, pressing Dots 3-8 Chord is the same as pressing the Ctrl key. Windows then waits for the key which will complete the Ctrl combination, such as the letter A to make Ctrl+A to select all, or the letter C to make Ctrl+C to copy the selected text to the clipboard. Repetition of frequently used keystrokes such as the Ctrl key combinations already mentioned, Windows commands such as Windows Key+M, and JAWS commands such as Insert+T should imprint these key associations firmly in your memory.
Function Keys
To simulate the function keys (F1 through F12), press Dots 1-8 Chord followed by A through L (which correspond to 1 through 12). For example, to simulate the F6 key, press Dots 1-8 Chord, then F (Dots 1-2-4). If the function key is part of a key combination, add the appropriate modifiers while holding down Dots 1-8 Chord. For example, to simulate the keystroke Insert+F2, press Dots 1-2-8 Chord, then B (Dots 1-2).
Quick Start
Note: Before turning ElBraille on for the first time, fully charge the battery using the supplied AC adapter. The unit emits two ascending tones and vibrates when the AC adapter is connected and emits two descending tones and vibrates when the adapter is disconnected. When the battery is charging, the LED indicator lights up red. It takes approximately five to seven hours to fully charge the unit.
Turning On ElBraille
To turn on the ElBraille, press and hold the recessed Power button located directly above E1 until the unit beeps and vibrates. During the startup process, you will hear a series of short beeps and feel occasional vibrations. Once the device has booted, you will hear JAWS speaking and the display will show some text. Finally, you will be placed on the Windows Desktop.
Turning Off or Restarting ElBraille
To put the ElBraille to sleep, completely shut down, or restart, do the following:
- Press Windows Key+D (Dots 4-8 Chord followed by Dots 1-4-5) to move focus to the Desktop.
- Press Alt+F4 (Dots 1-6-8 Chord followed by Dots 1-4-5) to open the Shut Down Windows dialog box.
- In the combo box, use the Left Rocker bar to select an option and then press Dot 8. If you decide to continue working, press Z Chord (Dots 1-3-5-6+Spacebar) to cancel.
You can also press the Power button to put ElBraille to sleep. Press the Power button again to wake the unit up and resume working where you left off.
Note: Shutting down or restarting can take some time. Please wait for the beeps and vibration alerts indicating the device is turned on or turned off.
ElBraille Emergency Menu
Sometimes, it may be necessary to shut down or restart if the device is not working correctly. For example, you unexpectedly lost speech or braille output from JAWS. You can easily do this using the ElBraille Emergency menu. This menu provides speech and braille output even if JAWS is not currently working correctly.
To open the Emergency menu, press and hold the E1 button. You will hear a beep followed by a menu containing three items: Restart JAWS, Shut Down, and System Reboot. Use the NAV Rockers to navigate the menu and press a NAV Mode button to activate the selected item. To close the menu, press Right Shift+Dot 1. Alternatively, you can use the Volume Up/Down rocker to navigate, the E4 button to activate an item, or E1 to close the menu.
Note: Use the Emergency menu only when absolutely necessary as shutting down or restarting from this menu will not guarantee anything you are currently working on is saved. In addition, if JAWS speech is currently working, you will hear double speaking as the speech in this menu is independent from JAWS.
Braille Display Modes
By default, when the Focus 40 Blue is docked, it works as a braille display with ElBraille. However, it can also be used as a stand-alone Focus 40 Blue that can be connected to a PC using the USB C port on the side of the ElBraille or used as a Bluetooth device.
To hear the current braille display mode, press E6. To switch between modes, press and hold E6 until you hear a brief tone.
When the ElBraille is on, switching the braille display mode will turn the display off.
If you connect the ElBraille to a PC using the USB C port on the right side of the unit, the braille display mode automatically switches to the PC connection, and the Focus 40 Blue acts like a stand-alone display. You can then press and hold E6 to toggle the Focus between the ElBraille and PC connection. When you disconnect from USB, the braille display mode automatically switches back to the ElBraille connection.
If the ElBraille is off, the display operates as if it was a stand-alone Focus 40 Blue, and the ElBraille buttons do nothing.
Note: The ElBraille will charge when connected to a computer through the USB C port. However, charging time will take longer than with the supplied AC adapter.
Viewing Device Status Information
Use the ElBraille buttons at any time to check the battery status, network connection, or the time and date.
- To check the battery status, press E2.
- To view wireless network status information, press E2 twice quickly.
- To view the current time, press E3.
- To view the current date, press E3 twice quickly.
Default ElBraille Key Assignments
Following is a list of the default assignments for the ElBraille buttons.
- E1: Open ElBraille Main menu
- E1 (press and hold): Open ElBraille Emergency menu
- E2: Report battery status
- E2 (twice quickly): Report wireless network connection status
- E3: Report current time
- E3 (twice quickly): Report current date
- E4: Start ElNotes or create a text note
- E4 (press and hold): Record a voice note
- E5: Not assigned
- E6: Report current braille display mode
- E6 (press and hold): Toggle the braille display mode
- E7: Not assigned
Note: You can modify the default key assignment for each button except for E6.
ElBraille Main Menu
The ElBraille main menu turns your device into a convenient notetaker. From this menu, you can quickly accomplish many useful daily tasks, such as writing notes or using the calculator.
To open the ElBraille main menu, press E1. This menu contains a number of items including:
- My Files — opens Windows Explorer.
- Text Editor — opens Windows Notepad.
- Notes — opens ElNotes application for creating text and voice notes.
- Phone — opens ElPhone application for sending text messages.
- Audio Player — opens Windows Media Player.
- Office Apps submenu — if you have purchased and installed Microsoft Office, opens a submenu listing the installed Microsoft Office applications (Word, Excel, Outlook, PowerPoint).
- Internet Browser — opens Google Chrome browser.
- E-mail — opens Built-in Windows Mail client.
- Calculator — opens Windows Calculator.
- ElBraille Utilities submenu — opens ElBraille Utilities submenu which contains the following items: the Keyboard editor, Settings, Check for updates, Help, About ElBraille.
Use the Rocker bars to navigate through the menu and press Dot 8 to activate an item. Each menu item also offers a corresponding access key you can press to quickly select it. These access keys are announced by JAWS as you navigate.
For example, you can use this menu to create a text file by doing the following:
- Press E1, and then press E (Dots 1-5). The text editor opens.
- Type in your text.
- To save the file, press Ctrl+S (Dots 3-8 Chord, followed by Dots 2-3-4). The Save File dialog box opens.
- Type in the file name and navigate to the Save button by using Dots 4-5 Chord, and then press Dot 8.
- To close the text editor, press Alt+F4 (Dots 1-6-8 Chord, followed by Dots 1-4-5).
For more information on working in an application, refer to the help for the specific application.
Basics of Working with JAWS and Windows on ElBraille
Windows Basics
Using Windows with JAWS on the ElBraille is basically the same as using a regular Windows PC. The only difference is that with ElBraille, commands are performed using the ElBraille buttons and the Focus Blue controls. The following describes how to access some of the more frequently used Windows features. For more information, see the help for Windows as well as the JAWS Help.
The Start Menu
To open the Start menu, press Right Shift+Dot 4. You will be focused in the Search edit box where you can begin typing the name of an app or setting you want to find. Press a Rocker bar to navigate the list of search results and press Dot 8 to select one.
To view the list of frequently used apps, configure your account, view all apps, or turn off the device, press Tab or Shift+Tab (Dots 4-5 Chord or Dots 1-2 Chord) to navigate through the Start menu. Use a Rocker bar to move through list boxes and dropdown menus. Press Dot 8 to activate the selected item or to activate a button.
To close the Start menu, press Dots 1-3-5-6 Chord.
Working With Windows and Dialog Boxes
Windows dialog boxes can contain text information as well as various controls including check boxes, radio buttons, buttons, sliders, edit fields, and so on.
To read the window title, simultaneously press the top of the Left and Right Rocker bars. To read the status bar, simultaneously press the bottom of the Left and Right Rocker bars. To read the contents of the dialog box, press Right Shift+Dots 1-2.
To move between dialog box controls, press Tab or Shift+Tab (Dots 4-5 Chord or Dots 1-2 Chord). You can select a radio button, or select or clear a check box by using the Spacebar or a Cursor Route button. To activate a button, press the Spacebar, Dot 8, or a Cursor Route button. When focused in an edit field, enter text using the Perkins-style braille keys. To adjust the value in a slider, press a Rocker bar to move by small increments or press a Rocker bar in conjunction with a Selector button to move by larger increments. If the dialog box contains multiple pages (tabs), press Dots 5-6 Chord or Dots 2-3 Chord to move between the tabs.
You can have several applications open at once. The JAWS Window List dialog box enables you to switch quickly between running apps. To open the Window List dialog box, press Right Shift+Dot 5. Use the Rocker bars to move through the list of running applications and press Dot 8 to switch to the selected app.
For more information, please refer to the JAWS help system.
Entering Data
Use the Perkins-style braille keyboard to type text on ElBraille. You can enter text in computer braille, or contracted or uncontracted braille. If you choose to type in contracted braille, your input is immediately translated back as normal text in the current email, document, or form. If an application or specific edit box does not support contracted braille, JAWS announces “Computer Braille.” In addition, the computer braille start symbol, dots 4-5-6 followed by dots 3-4-6, is shown on the braille display to indicate when computer braille is required. For more information, refer to the JAWS Help.
You can write and edit text not only in text editing applications, but also in edit fields in Windows dialog boxes as well as forms on web pages. In all cases, the commands for editing text are the same. To start a new line, use Dot 8. To backspace and remove the previous character, use Dot 7. To delete the character under the cursor, use Left Shift+D (Dots 1-4-5) or Dots 1-2-3-4-5-6 Chord.
Basic Reading and Navigation Commands
| Description | Keystroke |
|---|---|
| Say Current Line | C Chord (Dots 1-4 Chord) |
| Say Previous Line | Dot 1 Chord |
| Say Next Line | Dot 4 Chord |
| Say Current Word | Dots 2-5 Chord |
| Say Previous Word | Dot 2 Chord |
| Say Next Word | Dot 5 Chord |
| Say Current Character | Dots 3-6 Chord |
| Say Previous Character | Dot 3 Chord |
| Say Next Character | Dot 6 Chord |
| Say All | Dots 1-2-4-5-6 Chord |
Windows Explorer
To open Windows Explorer, press E1, and then select My Files or press the letter F (Dots 1-2-4). Use the Rocker bars to navigate the list of files and folders and press Dot 8 to open the selected item. To go back to the previous folder, press Dot 7.
Other Common Commands
| Description | Command |
|---|---|
| Copy to Clipboard | Left Shift+C (Dots 1-4) |
| Cut to Clipboard | Left Shift+X (Dots 1-3-4-6) |
| Paste from Clipboard | Left Shift+V (Dots 1-2-3-6) |
| Undo | Left Shift+Z (Dots 1-3-5-6) |
| Delete | Left Shift+D (Dots 1-4-5) |
Common QWERTY Keyboard keys Simulated on the Braille Display
| QWERTY Keystroke | Braille Keystroke |
|---|---|
| Escape | Z Chord (Dots 1-3-5-6 Chord) or Right Shift+Dot 1 |
| Alt (activates the menu bar in an application) | Right Shift+Dot 2 |
| Applications Key | Right Shift+Dot 2 Chord |
| Windows Key (activates the Windows Start menu) | Right Shift+Dot 4 |
| CAPS LOCK | Right Shift+Dot 7 Chord |
| BACKSPACE | Dot 7 |
| Enter | Dot 8 |
| Tab | Dots 4-5 Chord |
| Shift+Tab | Dots 1-2 Chord |
| Home | Dots 1-3 Chord |
| End | Dots 4-6 Chord |
| PageUp | Selector Button+Rocker Bar Up or Dots 2-3-7 Chord |
| PageDown | Selector Button+Rocker Bar Down or Dots 5-6-7 Chord |
| DELETE | Dots 1-2-3-4-5-6 Chord or Left Shift+D (Dots 1-4-5) |
Basic JAWS Setup
ElBraille users have access to all JAWS features, just like on a standard Windows PC. This section covers some basic information to help you get started. For more information about working with JAWS, refer to the JAWS help system. To open JAWS Help, press Right Shift+Dots 2-4-5 to open the JAWS main window, H to open the Help menu, and then J.
JAWS Startup Wizard
The JAWS Startup Wizard allows you to customize some of the more commonly used JAWS settings. These include speech rate and verbosity, typing echo, braille translation settings, and more. The Startup Wizard can be accessed at any time by doing the following:
- Press Right Shift+Dots 2-4-5 to open the JAWS main window.
- Use a Rocker bar to navigate to the Help menu and press Dot 8.
- When the Help menu opens, press Z (Dots 1-3-5-6) to open the Startup Wizard.
The Startup Wizard consists of several pages of options. After making your changes on each page, choose the Next button to move to the next page in the wizard. On the last page, choose the Finish button to save your changes.
Turning off Speech
If you prefer to only use the braille display, you can limit the amount of speech you hear or completely turn it off by using the Right Shift+M (Dots 1-3-4) command.
By default, pressing Right Shift+M activates Speech On Demand which restricts speech to a limited set of reading keystrokes. Speech On Demand is ideal for braille users who find too much speech overwhelming, but still want speech for certain tasks like reading a window title, checking the time, or speaking the current character, line, sentence, paragraph, or doing a Say All. While Speech On Demand is active, press Insert+Spacebar (Dots 2-8 Chord followed by Spacebar) and then Shift+S (Dots 2-3-4-7) to completely mute speech. Press Right Shift+M again to switch back to full speech.
If you want the Right Shift+M command to toggle between full speech and completely muting speech, open Settings Center, expand the Speech Options group, and set the Less Speech Options item to Mute Speech. For more information about Speech on Demand, please refer to the JAWS Help.
Connecting to a Network
ElBraille can connect to wireless networks. You can also connect the unit to mobile networks using the built-in LTE modem. The following sections describe how to connect to these networks.
Connecting to a Wi-Fi Network
- Press Windows Key+I (Dots 4-8 Chord, Dots 2-4) to open Windows Settings.
- Navigate to Network and Internet and press Dot 8.
- Select Wi-Fi and press Dot 8.
- Select the Show available networks link and then navigate to the list of available networks.
- Use the Left Rocker bar to select the network you want to connect to and press Dot 8. The Connect Automatically check box and the Connect button will appear. The check box is selected by default. If you want to connect to the network only once, clear this check box.
- Press Dots 4-5 Chord to navigate to the Connect button and press Dot 8 again. If the network is secure, you are prompted to enter a password.
- Type in the password and press Dot 8. If the connection is successful, you will see “Connected” near the selected network in the networks list.
Connecting to a Mobile Network
Before you can connect to a cellular network to use its data, you must first turn on the ElBraille's internal modem by doing the following:
- Press E1 followed by U to open the ElBraille Utilities menu.
- Use the Left Rocker bar to navigate to Settings and press Dot 8.
- Select Modem and press Spacebar to enable it.
- Navigate to the OK button and press Dot 8.
In the United States or Canada, most cellular carriers will need the International Mobile Equipment Identification (IMEI) number of your ElBraille to activate the SIM card for use on the carrier’s network. To get the ElBraille's IMEI number and register the unit on your carrier's network, do the following:
- Press Windows Key+X (Dots 4-8 Chord, Dots 1-3-4-6) to open the Quick Link menu.
- Select “Windows PowerShell (Admin)”, making sure to select the Admin one in the list.
- Type <kbd>netsh mbn show interface</kbd> and press Dot 8. The value of the “device ID” parameter is displayed. This is the IMEI of your ElBraille’s modem. Make sure to record it.
- Type <kbd>exit</kbd> and press Dot 8 to close PowerShell.
- Provide this IMEI number to your cell carrier in order to register the ElBraille on their network.
- Hold the activated SIM card, with the angled corner facing away from you and to the right, and insert it into the Micro-Sim slot on the right side of the unit under the SD card slot until it clicks into place (The cellular account must have available data).
Once the SIM card is inserted, the ElBraille should automatically switch to your cellular network when a Wi-Fi connection is not available. To make sure the ElBraille can use your cellular network, do the following:
- Press Windows Key+I (Dots 4-8 Chord, Dots 2-4) to open Windows Settings.
- Navigate to Network and Internet and press Dot 8.
- In the Network and Internet list box, navigate to Cellular and press Dot 8.
- Verify the name of your cellular provider and that ElBraille indicates “Connected”.
- Press Alt+F4 (Dots 1-6-8 Chord, Dots 1-4-5) to close Settings.
Safety and Maintenance
Do not attempt to repair ElBraille or open its case. This product contains no user serviceable parts. Any unauthorized attempt to service or replace internal components will void the product warranty.
Keep ElBraille away from wet areas, rain, and other sources of liquids. Do not submerge ElBraille.
Always operate ElBraille in a place where the temperature is between 5° and 35° C (41° and 95° F).
Do not store in places subject to temperature extremes such as a parked car.
Use only the power adapter that came with ElBraille to charge its internal battery pack. Other adapters may damage the unit.
Troubleshooting
| Problem | Solution |
|---|---|
| The device will not turn on. | Charge the battery using the supplied AC adapter. If the battery is too low, the unit may not boot even when connected to the charger. Wait several minutes and then try turning the unit on again. |
| The battery is not charging or is taking longer to charge than expected. | Make sure you are using the charger supplied with the device. If the battery is charging, the LED indicator glows red. |
| Extra dots are appearing on the display and dots are sticking. | Clean the display as described in the Focus 40 Blue user guide. |
Service and Support
You can contact Technical Support to receive technical assistance by e-mail or telephone, see contact information section.
Please provide the following information along with Your questions:
- Product name
- Product serial number
- What is the problem
- What you were doing when the problem occurred
- How you tried to solve the problem
Warranty and Registration
Congratulations on your purchase of the ElBraille!
The unit and its accessories come with a two-year warranty against manufacturing defects.
Note: These devices have no user-serviceable components. Any unauthorized attempt to service or replace internal components by opening the case will void the product warranty.
Please contact Technical Support using contact information below for assistance in troubleshooting any problems. If necessary, the technical support specialist will issue a Return Materials Authorization (RMA) number that must be referenced on the outside of the package containing your returned unit. The unit or its accessory will then be exchanged or repaired as needed.